Running tests#
Bokeh is a large, multi-language project and relies on complex and comprehensive tests and testing tools to help ensure consistency and prevent regressions.
This chapter describes how to run various tests in a local development environment and in Bokeh’s continuous integration (CI) system on GitHub.
Local testing#
Almost all of Bokeh’s tests can be run locally. However, some of the tests can be complex to set up and run correctly on a local system. Therefore, all tests will run in Bokeh’s CI when you create a Pull Request on Bokeh’s GitHub repository. You don’t need to set up and run all tests locally.
Follow those general guidelines to decide which tests to run locally:
- Whenever you change anything in Bokeh’s codebase
Run Bokeh’s codebase tests
- When you edit Bokeh’s Python code
Run Bokeh’s Python unit tests
- When your work involves UI elements
Run Bokeh’s Python integration tests
- When your change anything related to BokehJS
Run Bokeh’s JavaScript tests
For reference, this section provides an overview of all available tests and how to run them locally on most systems. Generally, it makes the most sense to only run specific tests related to what you are working on. See Select specific tests for instructions on how to select and deselect specific Python tests. See Select specific BokehJS tests for instructions on how to select and deselect specific BokehJS tests.
Check basic requirements#
Before attempting to run Bokeh tests locally, make sure you have successfully completed all of the steps in the Setting up a development environment section of this contributor guide.
Check that Bokeh’s sampledata is installed and up to
date by running bokeh sampledata. In case you are not able to install the
sampledata on your system, you have the option to
disable those specific tests.
Several tests also require Selenium and a corresponding web driver to be available on your system. While it is possible to use other web drivers for some tests, the recommended setup is to use Selenium with ChromeDriver and Chrome. See Additional dependencies for installation instructions and more information. In case Selenium is not available on your system, you have the option to disable those specific tests.
On some Unix platforms, you may also need to increase the “maximum number of open file descriptors”. Some tests open many files when testing the server, so this number should be at least 1024.
ulimit -n 1024
Run codebase tests#
The most basic set of tests are Bokeh’s codebase tests. This includes checking Python code with Ruff, checking JavaScript code with ESLint, and various other tests for issues such as unused imports and extra white spaces.
Any edits you make to Bokeh’s Python or JavaScript codebase should pass this test.
Run this command from the top level of the repository:
pytest tests/codebase
Run Python tests#
Bokeh includes a number of tests that are focused on Bokeh’s Python code. These tests use pytest and are located in the tests folder.
Whenever you work with Bokeh’s Python code, you should run Bokeh’s codebase and Python unit tests. In case your work also included changes to user interface elements, you should also run Bokeh’s Python integration tests.
These are some command-line arguments for pytest that are helpful to know
when working with Bokeh’s pytest-based tests:
-k: Provide a search string to filter for specific tests. See Select specific tests.-m: Select or deselect specific tests based on markers. See Select specific tests.-n: Distribute testing over several CPUs or cores. Provide a number to define the number of cores to use. Set toautoto use all available cores. For example:pytest -n 4 tests/codebase. See pytest-xdist.-v: Run test with more verbose output.--driver: Use a specific web driver for Selenium-based tests ("chrome","firefox", or"safari"). For example:pytest --driver="firefox" tests/integration/.--no-js: Skip any JavaScript code and only test Python code.
See the pytest documentation for more options.
- Unit tests
To run Bokeh’s Python unit tests, use the following command at the top level of the repository:
pytest -m "not selenium" tests/unit
Note
This command will exclude unit tests that require Selenium. Because Selenium can be difficult to set up and because some unit tests require both geckodriver and ChromeDriver to be available on your system, using
-m "not selenium"is the recommended way to run unit tests locally. Once you create a Pull Request, Bokeh’s CI will run all tests, including Selenium-based unit tests. In case Selenium with both geckodriver and ChromeDriver is available on your system, you can run all unit tests withpytest tests/unit.
- Code coverage (Python unit tests)
To create a coverage report for Python unit tests, use
pytestwith the command-line options--cov=bokehand--cov-config=tests/.coveragerc:pytest --cov=bokeh --cov-config=tests/.coveragerc
Coverage with Bokeh’s Python unit tests should be around 90%. Coverage reports are only relevant for Python unit tests. There are no coverage reports for other Python tests or for any of the JavaScript code of BokehJS.
You also have the option to add
--cov=bokeh --cov-config=tests/.coveragercwhen running a specific subset of Python unit tests. This adds a coverage report to the test results. For example:pytest --cov=bokeh --cov-config=tests/.coveragerc -m "not selenium" tests/unit/bokeh/test_objects.py
See also
Coverage reports use the pytest plugin pytest-cov. For more information, see the documentation for pytest-cov.
- Integration tests
To run Bokeh’s Python-focused integration tests, use this command from the top level of the repository:
pytest tests/integrationThese tests mostly simulate UI interactions. Therefore, they require Chrome or Chromium and Selenium with the ChromeDriver web driver.
- Cross integration tests
This is a variant of integration tests where on Bokeh’s side a Python code sample (a test case) is run, which produces JSON output with the serialized document. That JSON is then stored in the repository under
tests/baselines/cross. When adding a new test case, run:pytest tests/test_cross.pyand then commit any new baselines and re-run tests. Only committed baselines are considered by the test runner.
Each test case must have a corresponding integration test in BokehJS, under
bokehjs/test/integration/cross.ts. These are equivalent to typical BokehJS’ integration tests. However, it’s recommended that image diff is skipped for tests that don’t require inspection of visual aspects of the output. Note that skipping image capture doesn’t disable generation of*.blffiles.Note that cross test cases must be carefully designed so that BokehJS can run them producing consistent and repeatable output, especially when capturing images. As with other kinds of tests, it’s permitted to use random data, because the test runner seeds Python’s and numpy’s random number generators. Follow BokehJS’ guidelines for creating robust integration tests.
- Run all available tests
You can run all available tests (Python and JavaScript unit tests, examples, and integration tests) by running the following command from the top-level directory:
pytest
- Select specific tests
To test a subset of the Bokeh package, pass a path to
pytest:pytest tests/unit/bokeh/models/Similarly, you can run a specific test by passing a specific file to
pytest:pytest tests/unit/bokeh/models/test_grids.pyAnother way to select or deselect specific tests is to use markers. Currently, Bokeh’s tests use the following two markers:
sampledata: a test that requiresbokeh.sampledatato be downloadedselenium: a test that requires selenium
For more information on setting your own markers, see Working with custom markers in the pytest documentation. To learn more about pytest’s various options to select specific tests, see Specifying which tests to run.
See also
For information on adding and updating Python tests, see Writing Python tests.
Run JavaScript tests#
Most of the JavaScript-based tests for BokehJS use a custom-made testing framework. This framework requires Google Chrome or Chromium. You need a recent version of one of these browsers available on your system to run those tests locally.
Run all BokehJS tests#
You can use pytest to run all available tests for BokehJS:
pytest tests/test_bokehjs.py
This is a shortcut to run all BokehJS tests. You can run the same set of tests
directly with node make, from the bokehjs subdirectory
of the source checkout:
node make test
This runs a combination of codebase, defaults, unit, and integration test suites.
Select specific BokehJS tests#
You also have the option to run these test suites individually, using
node make test:suite_name in the bokehjs subdirectory of the source
checkout:
node make test:codebase: Codebase tests checking file size limitsnode make test:defaults: Tests checking whether the defaults in Bokeh’s Python models match those of Bokeh’s JavaScript modelsnode make test:unit: Unit tests for BokehJSnode make test:integration: Visual integration tests comparing locally generated plots against a set of baseline files
You can combine the last two test suites by running node make test:lib.
Additionally, you can use search strings to select individual tests or groups
of tests. Use the -k argument to supply your search string. The search
string is case-sensitive. The BokehJS testing framework tries to match your
search string to the strings defined in the tests’ describe() and
it() functions. For example:
$ node make test:integration -k "Legend"
This will only run integration tests that contain the string “Legend”.
Note
BokehJS Unit and integration tests require a recent version of Chrome or Chromium. The BokehJS testing framework starts the browser automatically with the right settings to produce consistent test results.
Testing with devtools server#
In addition to running BokehJS tests from the command-line, you can also use the BokehJS devtools server. This system requires the Chrome web browser to be available on your system. Use the BokehJS devtools server to run tests and review the visual tests’ output.
First, start the devtools server from the bokehjs subdirectory with the following command:
$ node test/devtools server
listening on 127.0.0.1:5777
You can now use the devtools server for the following operations:
- Inspecting visual test results
After running integration tests, you can use the devtools server to compare your local results with the baseline images. Open the displayed server URL (usually
127.0.0.1:5777) in the Chrome web browser and append/integration/report. This will open a comparison view of any tests where your locally rendered plot is different from the baseline file. For example: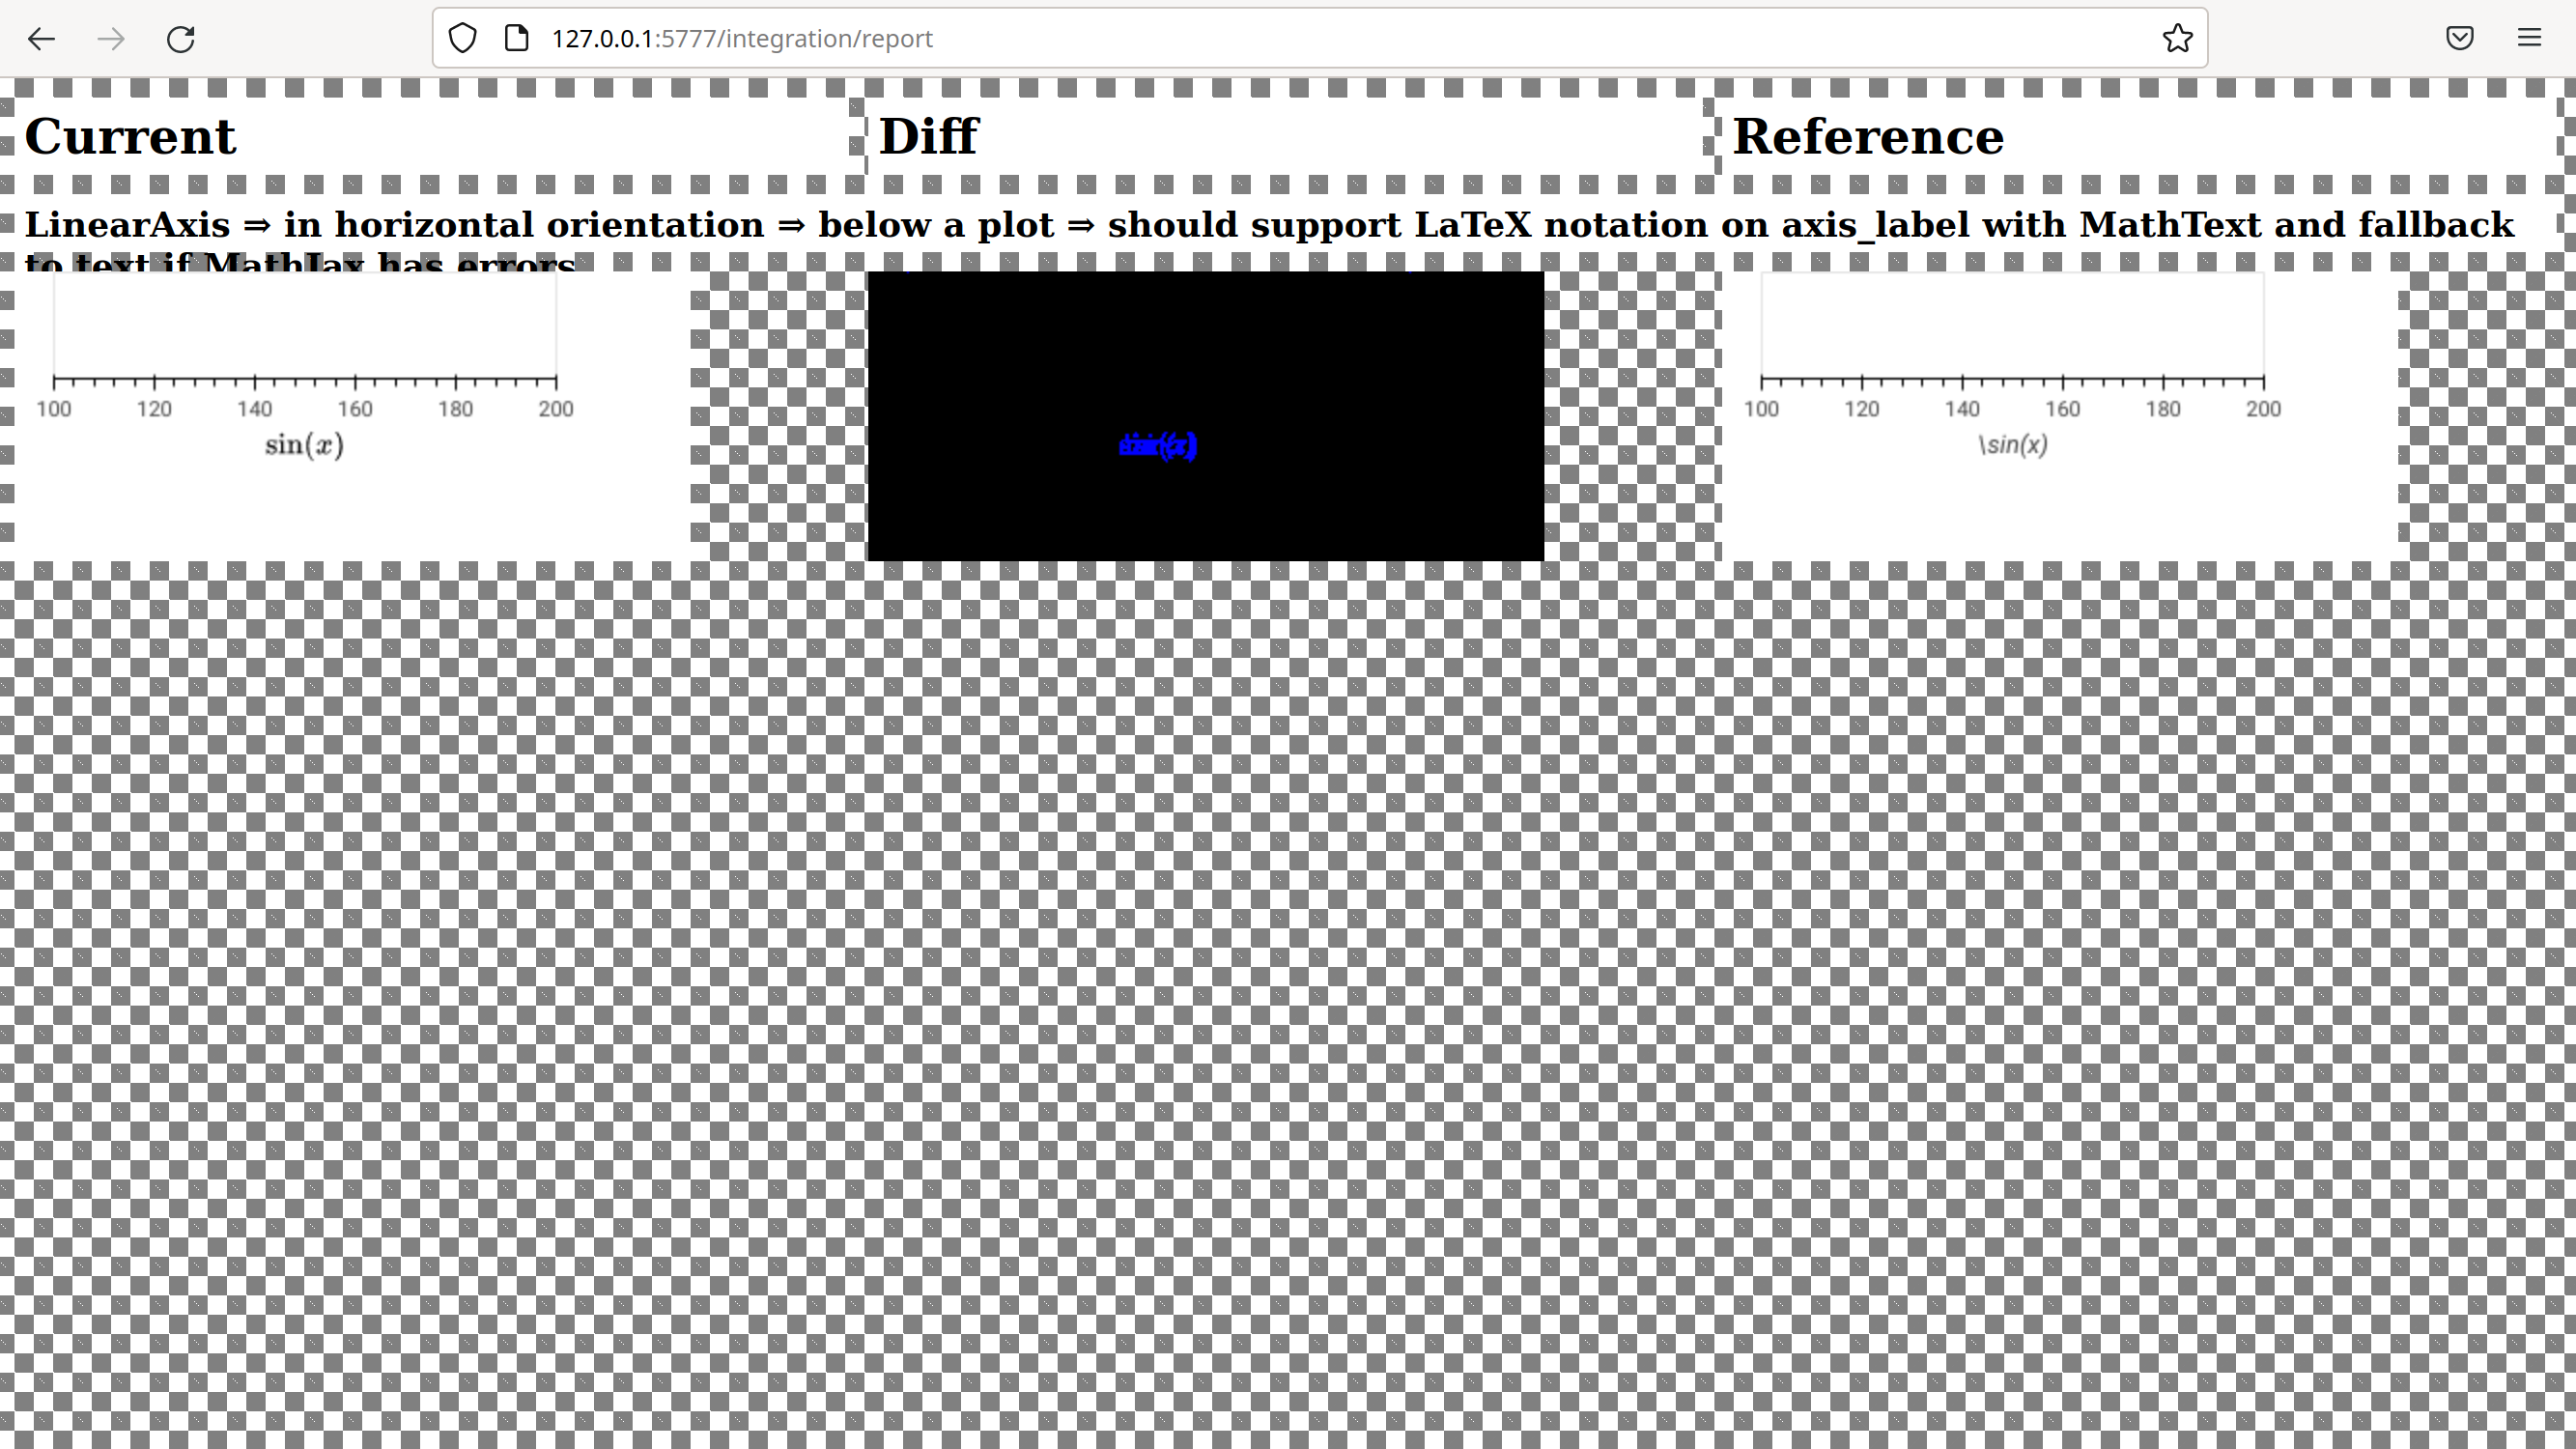
- Initiate test runs
You can also use the devtools server to initiate test runs. You have two options:
- Run tests from a JavaScript console
Open one of these three endpoints in your web browser:
/unit/defaults/integration
This loads BokehJS and the tests. To run the tests, issue
Tests.run_all()in Chrome’s JavaScript console. This allows you to set breakpoints before running code. You can also pass a search string, list of strings, or regular expression as the function’squeryparameter to only run specific tests. For example:Tests.run_all(query=/[Ll]egend/);
- Use endpoint to run tests
Initiate test runs by accessing one of the following endpoints with your browser:
/unit/run/defaults/run/integration/run
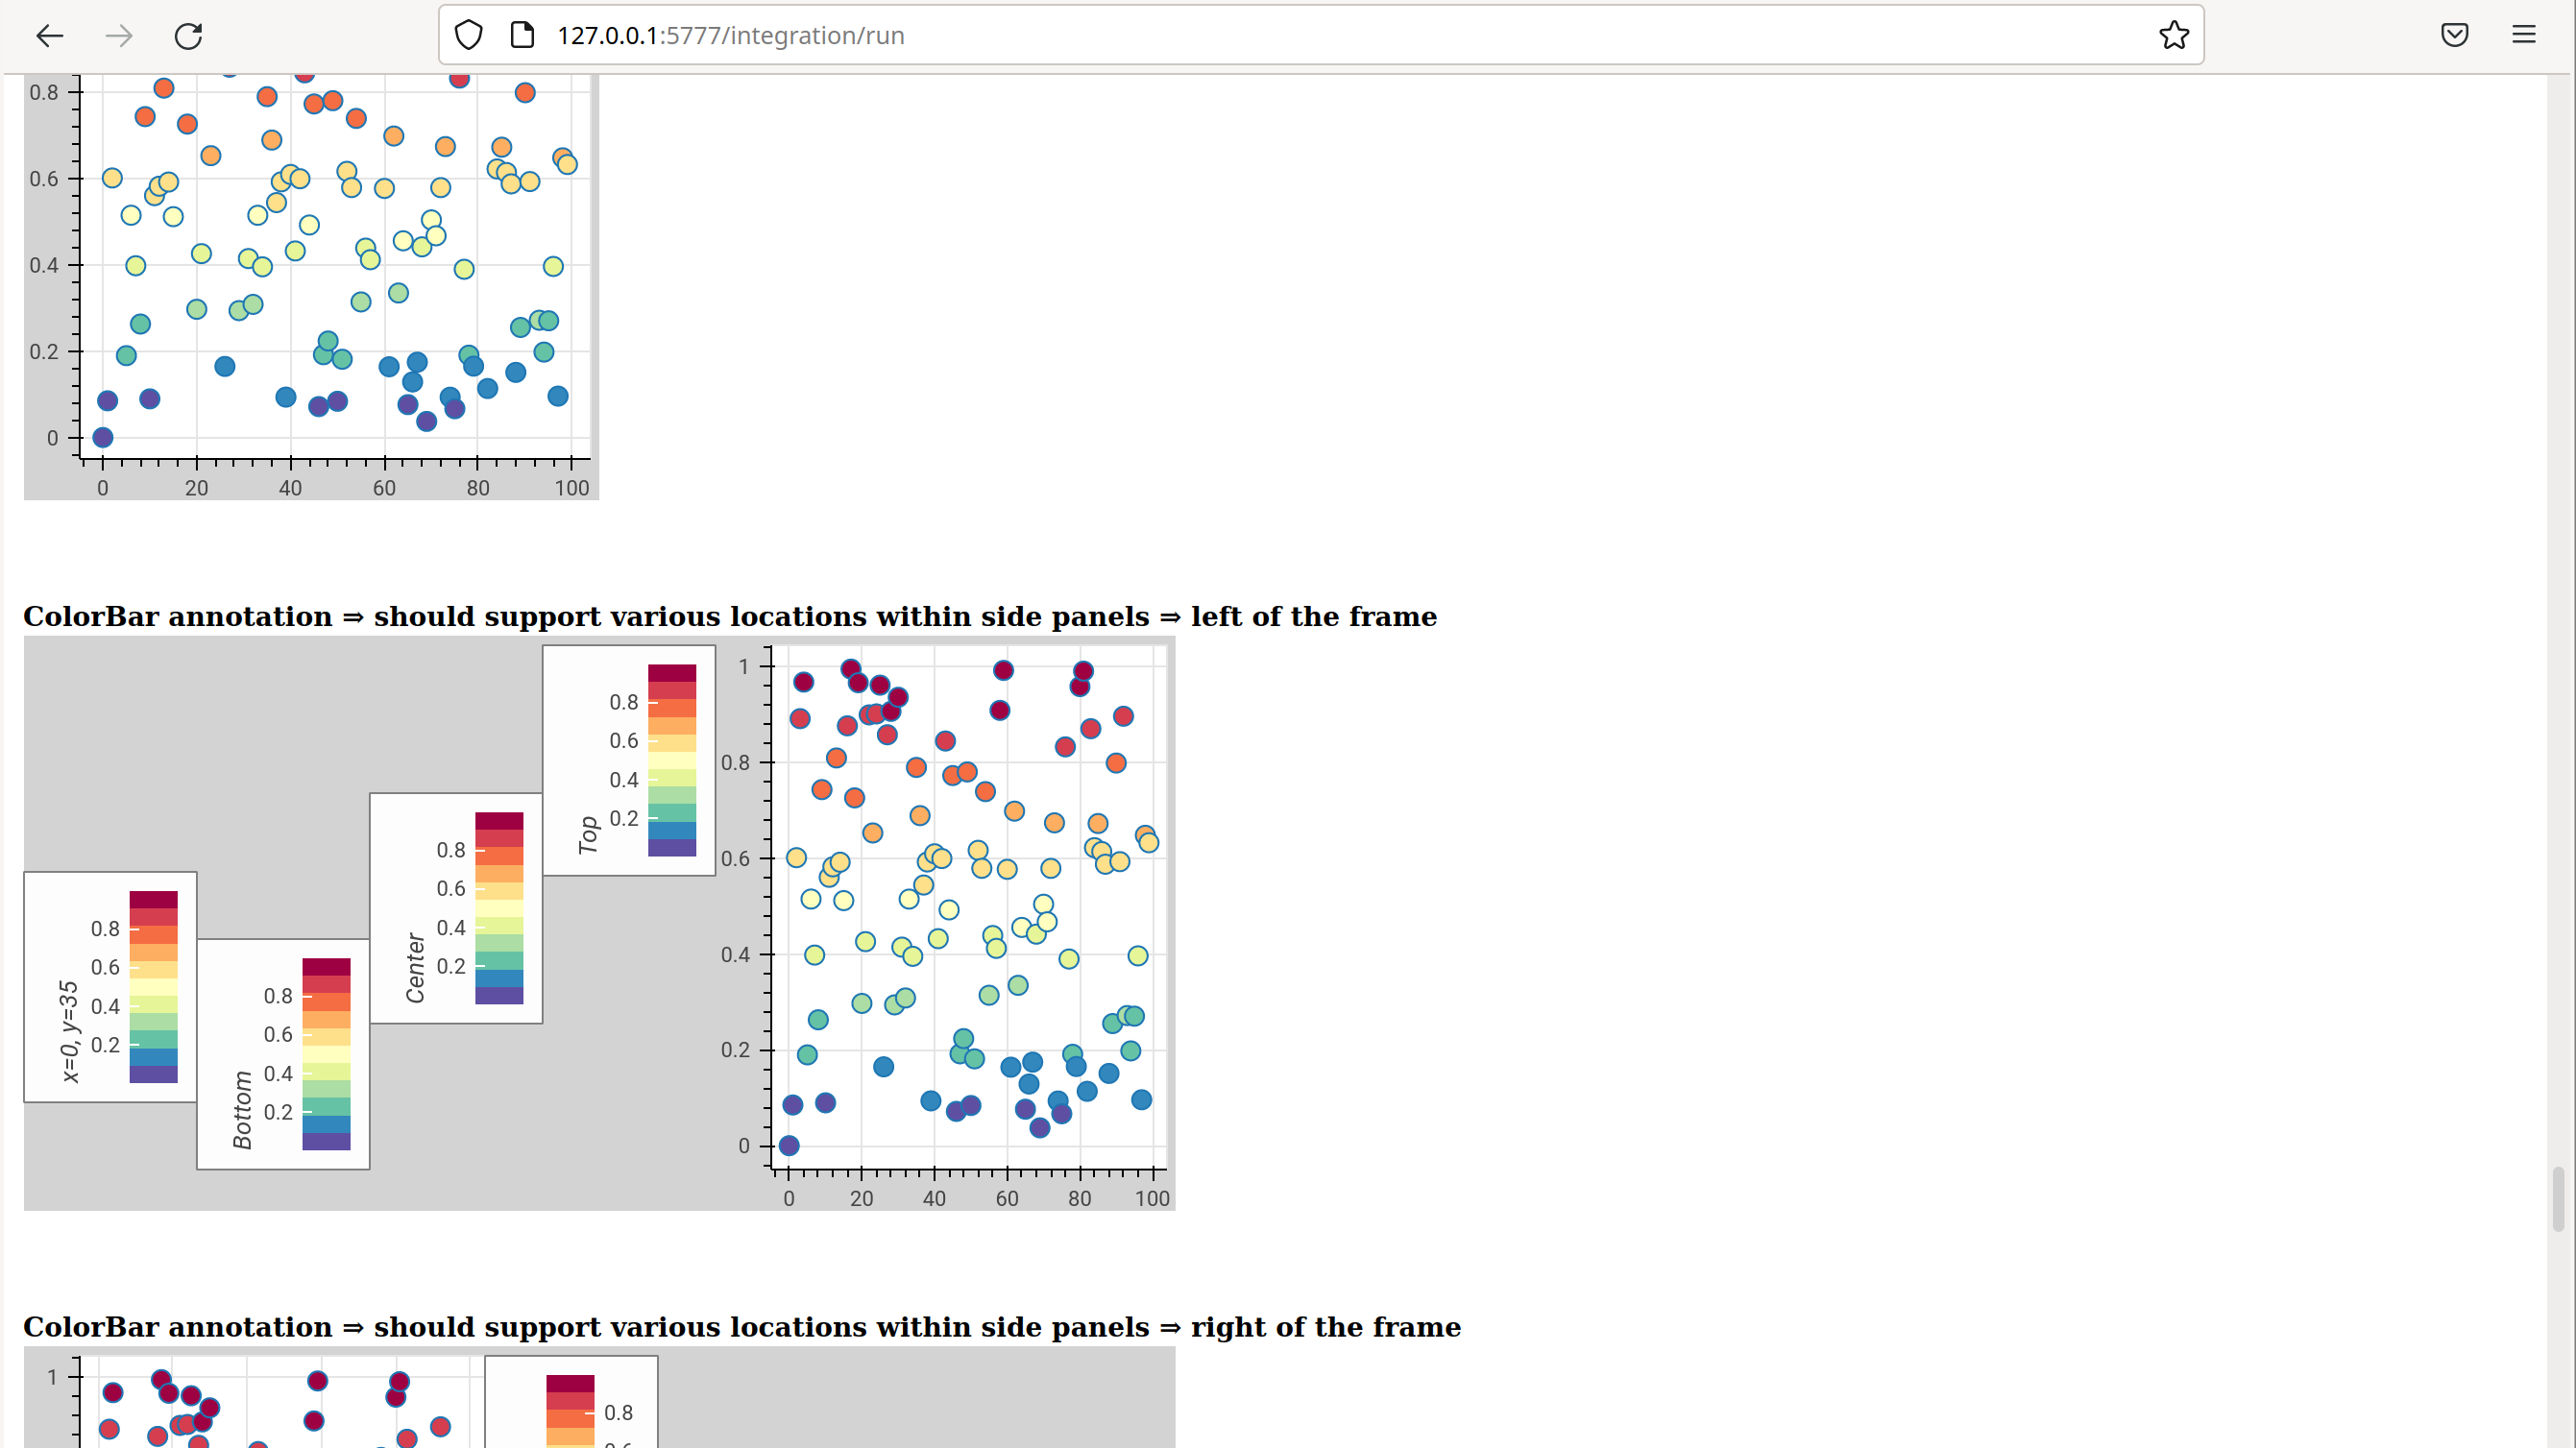
To only run or view specific tests, append ?k=some%20text to the URL. This
will filter tests by keyword.
To only run or view tests for a specific platform, append either
platform=linux, platform=macos, or platform=windows to the URL.
For information on adding and updating BokehJS tests, see Writing JavaScript tests (BokehJS).
Note
In most cases, the results of running tests locally with the regular Chrome GUI are the same as running them in Bokeh’s CI which uses a headless version of Chrome. However, there are rare cases where headless and GUI Chrome generate different results. In this situation, you can’t use the GUI - instead, you need to debug BokehJS’ code directly in the headless browser. See Debugging in headless Chrome for more information.
Run examples tests#
In addition to Bokeh’s Python- and JavaScript-focused tests, Bokeh uses a suite of examples tests. This suite runs a selection of the examples in the Bokeh repository to check whether each of the examples builds without generating errors. Running these tests also generates a report with screenshots of those plots.
The examples tests use a topics testing framework, including a custom configuration of Chrome. Therefore, it is recommended not to run those tests locally. Instead, Bokeh’s CI runs all examples tests once you create a Pull Request.
To run the examples tests locally, you first need to start a customized headless
version of Chrome in the background. This headless browser needs to be
started from the bokehjs folder. Use the following commands from the top
level of your source checkout directory:
cd bokehjs
node make test:run:headless
This starts a headless Chrome tool. Next, open a second terminal and run the tests from the top level of your source checkout directory:
pytest tests/test_examples.py
When running the tests, pytest also generates a report with screenshots of the
visual output of each of the examples. These screenshots are available in
examples-report.html. This file is located in the same directory that you
ran the tests from:
Note
The examples tests don’t analyze the generated screenshots and therefore won’t fail based on the visual output. You need to inspect the test report manually.
In addition, the examples tests generate a log file called examples.log
in the same directory.
Continuous Integration (CI)#
Every time you start a Pull Request or add new commits to an existing Pull Request branch on Bokeh’s GitHub repository, Bokeh’s Continuous Integration (CI) will run all available tests on your branch.
You can see the list of all current and previous CI runs at this URL: bokeh/bokeh
Environment files#
Bokeh’s CI runs tests on Linux, macOS, and Windows. It also runs tests with different versions of Python. The various testing environments are defined in their respective YAML files in the conda folder. In case you add or change dependencies, you need to update these files.
Etiquette#
CI services provide finite free build workers to Open Source projects. Please group your commits into meaningful chunks of work before pushing to GitHub instead of pushing every commit individually. This will help you be considerate of others who require access to these limited resources.