Deploying the Bokeh Server
The Bokeh server is an optional component that can be used to provide
additional capabilities, such as:
- publishing Bokeh plots for wider audiences
- streaming data to automatically updating plots
- interactively visualizing very large datasets
- building dashboards and apps with sophisticated interactions
The Bokeh server is built on top of Flask, specifically as a
Flask Blueprint. You can embed the Bokeh server functionality inside
a Flask application, or deploy the server in various configurations
(described below), using this blueprint. The Bokeh library also ships
with a standalone executable bokeh-server that you can easily run to
try out server examples, for prototyping, etc. however it is not intended
for production use.
The basic task of the Bokeh Server is to be a mediator between the original data
and plot models created by a user, and the reflected data and plot models in the
BokehJS client:
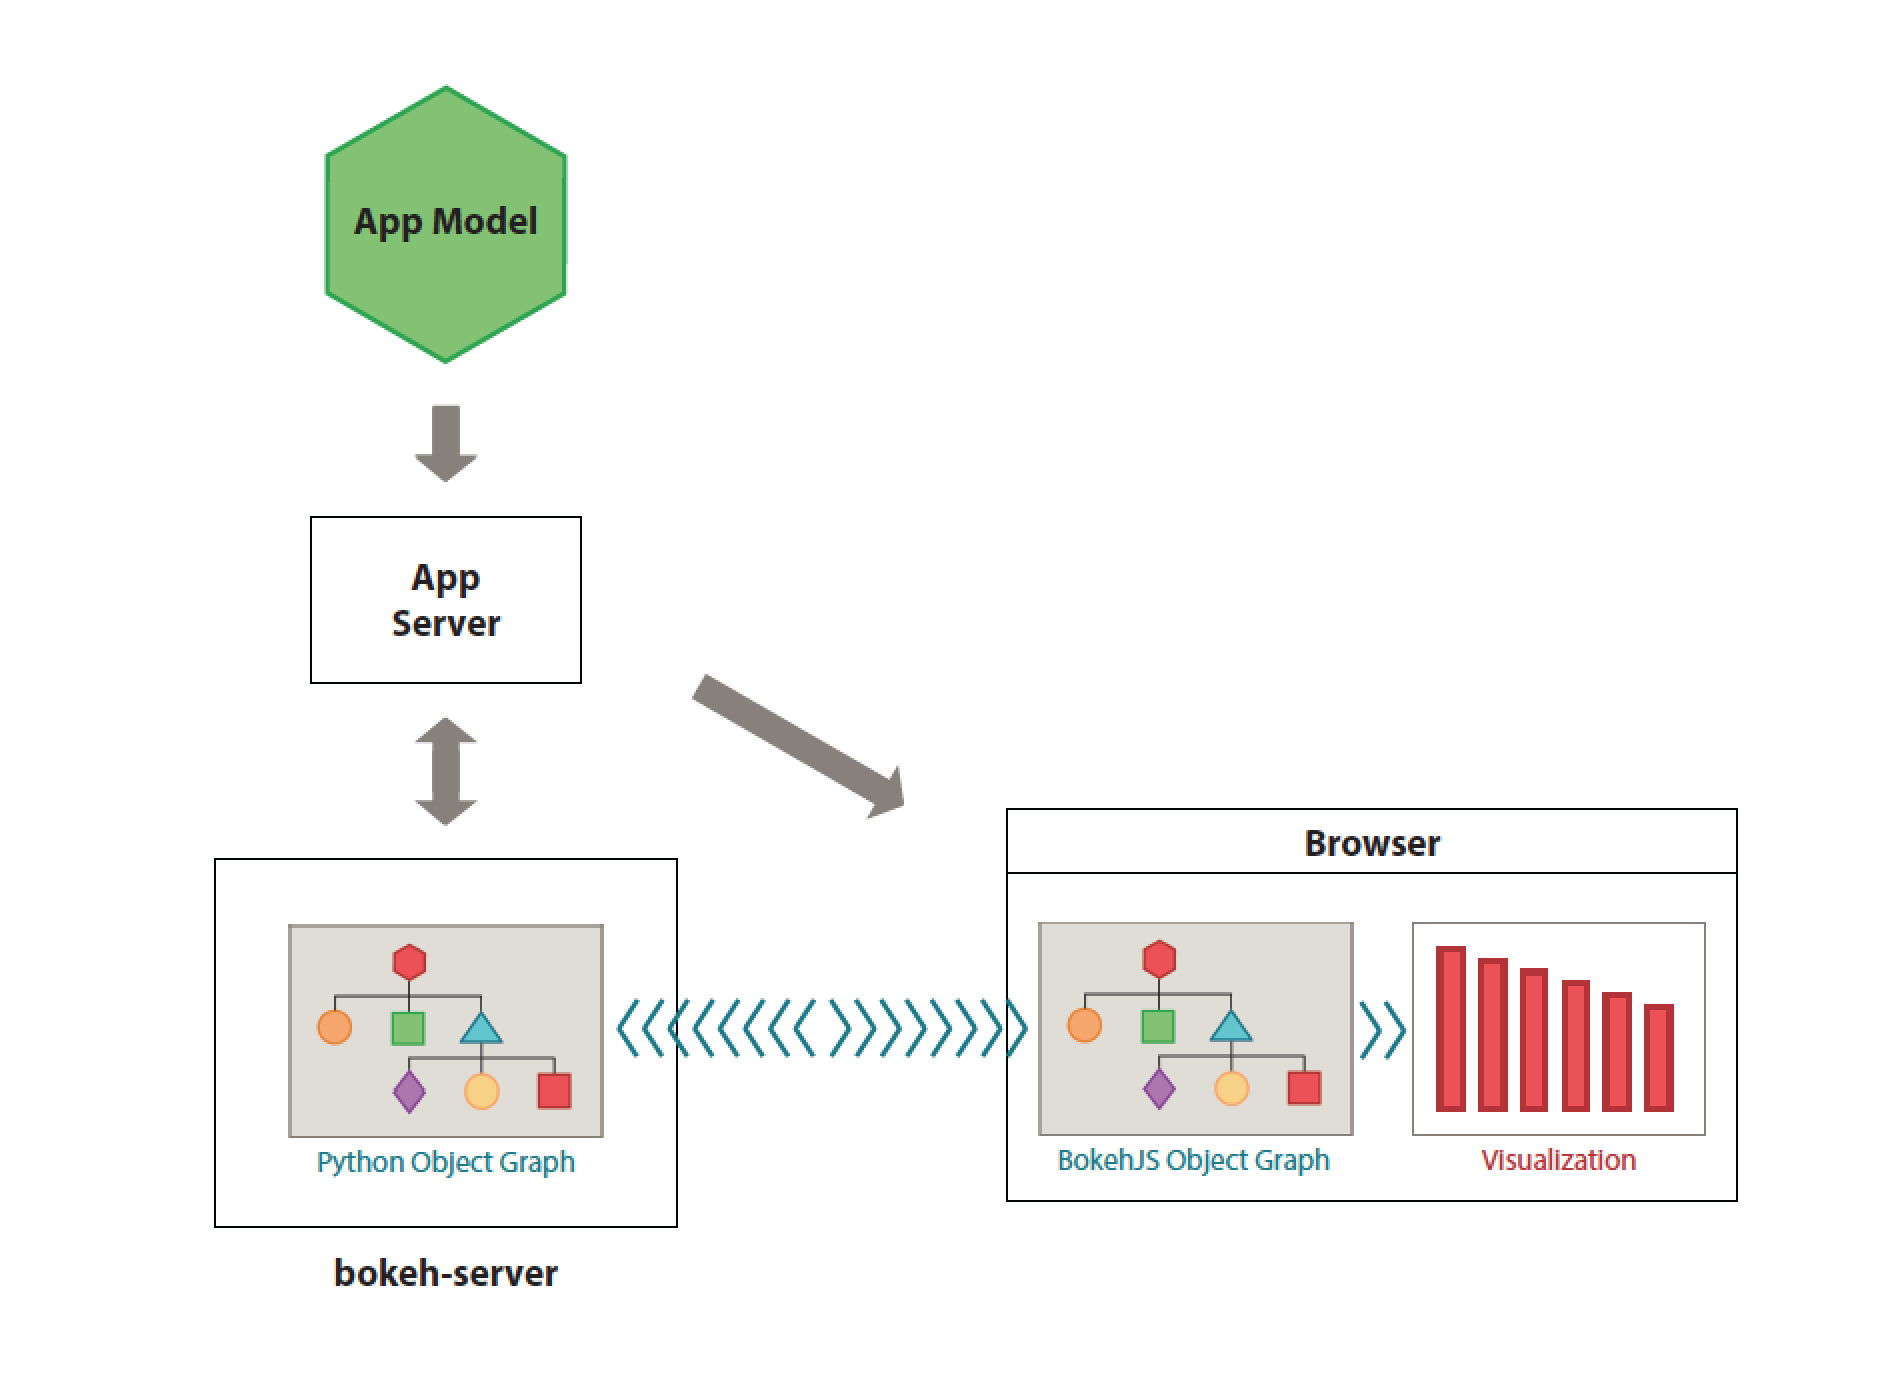
Here you can see illustrated the most useful and compelling of the Bokeh server:
full two-way communication between the original code and the BokehJS plot.
Plots are published by sending them to the server. The data for the plot can be
updated on the server, and the client will respond and update the plot. Users can
interact with the plot through tools and widgets in the browser, then the results of
these interactions can be pulled back to the original code to inform some further
query or analysis (possibly resulting in updates pushed back the plot).
We will explore the capabilities afforded by the Bokeh server in detail below.
The core architecture of bokeh-server develops around 2 core models:
A User controls authentication information at the user level and both models
combined determines the authorization information regarding user documents
that are private, so can be accessed only by the user, or public.
One thing to keep in mind when interacting with bokeh-server is that every
session open to the server implies that an user is logged in to the server.
More information about this can be found at the
Authenticating Users paragraph below.
If Bokeh was installed running python setup.py or using a conda package, then the
bokeh-server command should be available and you can run it from any directory.
Note
This will create temporary files in the directory in which you are running it.
You may want to create a ~/bokehtemp/ directory or some such, and run the
command there
If you have Bokeh installed for development mode (see Building and Installing),
then you should go into the checked-out source directory and run:
Note
bokeh-server accepts many input argument options that let the user customize
it’s configuration. Although we will use a few of those in this section we highly
encourage the user to run bokeh-server -h for more details.
Now that we have learned how to run the server, it’s time to start using it!
In order to use our running bokeh-server we need to create a plot and store it
on the server.
It’s possible to do it by using the Document and the Session objects.
The former can be considered as a namespace object that holds the plot
information while the later will take care of connecting and registering the
information on the server. It also acts as an open channel that can be used
to send/receive changes to/from the server.
As usual, the bokeh.plotting interface provides a set of useful shortcuts
that can be used for this. The result is that creating a line plot as a static
html file is not so different than creating it on a bokeh-server, as we can
see on the following example:
from bokeh.plotting import figure, output_server, show

output_server("line") # THIS LINE HAS CHANGED!

p = figure(plot_width=400, plot_height=400)

# add a line renderer
p.line([1, 2, 3, 4, 5], [6, 7, 2, 4, 5], line_width=2)

show(p)
As mentioned before bokeh-server does implement the concept of authentication.
At this point one could raise the following question: Really? So why I wasn’t asked
to login to register or the plot I’ve created in the previous section?
This is a good question and the reason is because bokeh-server defaults to
single user mode when launched. This is very important to keep in mind: when in
single user mode every request is automatically logged in as a user with username
defaultuser.
However for teams, and for plot publishing (see Publishing to the Server for
more details), it makes more sense to add an authentication layer. This way
users won’t be able to overwrite each other’s plots. To do enable multi user
mode, you need to turn on the multi_user bokeh server setting by using the
command line parameter -m. Once this is done, all scripts that use the
bokeh server must authenticate with the bokeh server.
Once again the Session object can be used to create or login users to the
server.
An user can be created with the following python code:
session = Session(root_url=url)
session.register(username, password)
or login with:
session = Session(root_url=url)
session.login(username, password)
Note
- The bokeh client library will store authentication keys (in the
~/.bokeh directory), so logging in is not necessary in subsequent
invocations.
As mentioned earlier, when running in multi user mode, a plot must be
published so that different logged users can access it. This can be done,
again, using the session object as the following snippet shows:
output_server('myplot')

# make some plots
cursession().publish()
A public link to a plot on the bokeh server page can be viewed by appending
?public=true To the url - for example if you have the url to a
plot http://localhost:5006/bokeh/doc/some-doc-id/some-plot-id,
You can generate a public link to the published plot using
http://localhost:5006/bokeh/doc/some-doc-id/some-plot-id?public=true.
Note
In addition, the autoload_server function call in bokeh.embed shown
in server data also takes a public=true
keyword argument, which will generate an embeddable html snippet
that will load the public version of a given plot
Streaming data to automatically update plots is very straightforward
using bokeh-server. As seen previously, Session object exposes
the session.store_objects method that can be used to update objects
on the server (and consequently on the browser) from your python code.
Here’s a simple example:
import time
from random import shuffle
from bokeh.plotting import figure, output_server, cursession, show

# prepare output to server
output_server("animated_line")

p = figure(plot_width=400, plot_height=400)
p.line([1, 2, 3, 4, 5], [6, 7, 2, 4, 5], name='ex_line')
show(p)

# create some simple animation..
# first get our figure example data source
renderer = p.select(dict(name="ex_line"))
ds = renderer[0].data_source

while True:
    # Update y data of the source object
    shuffle(ds.data["y"])

    # store the updated source on the server
    cursession().store_objects(ds)
    time.sleep(0.5)
Notice that in order to update the plot values we only need to update it’s
datasource and store it on the server using the session object.